Tag Archives: Cream Cheese

Oatmeal Nutella-cream cheese filled Whoopie Pies

Oatmeal Nutella Whoopie PiesSometimes the recipes for my whoopie pies are inspired by a particular craving, sometimes by a particular seasonal treat, sometimes a suggestion by a friend, and sometimes they are just based on the ingredients I have on hand.

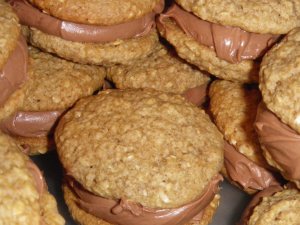
I knew I wanted to make a Nutella-cream cheese filling (and I had both Nutella and cream cheese) but I hadn’t totally decided on what kind of whoopie to stuff it in – vanilla, chocolate, chocolate chunk, something boozy… Well, I went shopping and meant to pick up either milk or buttermilk (I normally just have almond milk at home) but I completely forgot. I got home and realized that the only Whoopie Pies I could make without milk or buttermilk were the oatmeal ones. Besides the necessity to make these based on what I had on hand, I also wanted to try this recipe out since it was one of the few recipes in Whoopie Pies that I hadn’t yet tried!

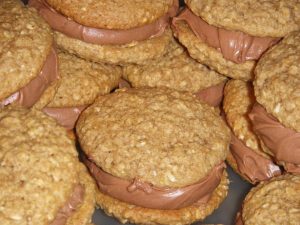
I actually really liked the texture contrast between the chewier oat-y Whoopie Pies and the smooth Nutella filling. Also, in case you are wondering, the Whoopie Pies are still soft (no crispy cookies here!) and “whoopie-pie-like”! And the filling is not at all lacking in Nutella taste! Yum!Oct 2012 043

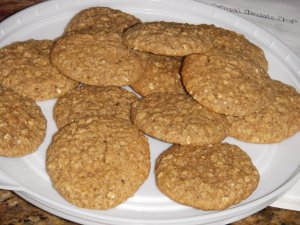
Oatmeal Whoopie Pies – from Whoopie Pies (makes about 18 filled Whoopie pies)

  • 1/4 cup butter, at room temp
  • 1/2 cup brown sugar
  • 1/4 cup white sugar
  • 2 eggs
  • 1 tsp vanilla
  • 1 1/2 cup rolled oats
  • 3/4 cup flour
  • 1/2 tsp baking soda
  • 1/2 tsp cinnamon
  • 1 tsp salt
  1. Preheat oven to 350°F and line two baking sheets with parchment paper.
  2. In the bowl of a stand mixer (or in a regular bowl and use your hand mixer), cream together butter and sugars until fluffy and pale, about 3 minutes. Beat in the eggs one at a time and add the vanilla.
  3. In a food processor, blender, or Magic Bullet (my preference!),Oct 2012 040 
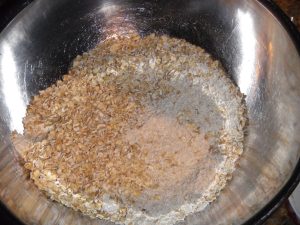
process 3/4 cup of oatmeal until it resembles whole grain flour (as can be seen in the picture on the right – in contrast to the unprocessed oats on the left). Transfer to a bowl and add the flour, baking soda, cinnamon, salt and remaining oats. Stir together.
  4. Add the dry ingredients to the wet and beat on low until combined.
  5. Spoon or scoop 1 to 1.5 Tb of batter onto the baking sheets about 2 inches apart. Bake for about 11 minutes or until the cookies are set and edges just start to brown.
  6. Let cool 3-4 minutes on the on the pan before transferring to a cooling rack.

Nutella Cream Cheese Filling

  • 1 cup NutellaCreamy Nutella Cream Cheese Filling
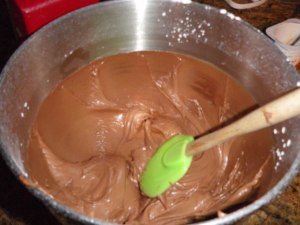
  • 4 oz (1/2 a pkg) cream cheese
  • 2 to 2 1/2 icing sugar
  1. Beat together Nutella and cream cheese.
  2. Add icing sugar 1/2 cup at a time until a medium consistency is reached. If you add to much and it becomes stiff, add milk 1 tsp at a time until it is soft and smooth!
Assemble by filling two equally sized & shaped Whoopie Pies with 1 to 1.5 Tb filling (generally use as much filling as you used for the batter of each side of the Whoopie). Squish together and enjoy!

Oct 2012 044


Tiramisu Filled Chocolate Whoopie Pies

Tiramisu Filled Chocolate Whoopie Pies

I am having trouble coming up with excuses to make Whoopie Pies right now. I have no real reason to make them, no parties to go to, no meetings that need something to brighten them, and with so many people still into their “New Year’s Resolutions” it is hard to bake them for no reason. It is a tough time of year for a Whoopie Pie blog! So when someone asked me to make them cupcakes, I took the opportunity to enlighten them to the delicious world of Whoopie Pies instead!

These Whoopie Pies were the basic chocolate Whoopie Pies (with a little Kahlua added for fun!) with a cream cheese Tiramisu filling. I used this Tiramisu Dessert Dip Mix and it worked well but instead you could use a couple teaspoons of espresso powder, 1 tablespoon of cocoa, and maybe a little Kahlua or something like that as your liquid. I really liked how these turned out but I can’t make promises for the espresso/cocoa suggestion – I would try it though & I think it would work!

Kahlua Chocolate Whoopie Pies

  • Butter & Sugar: Fluffy & Light!

    1 2/3 cups flour

  • 2/3 cup cocoa
  • 1 1/2 tsp baking soda
  • 1/2 tsp salt
  • 1/2 cup butter, softened at room temp
  • 1 cup packed brown sugar
  • 1 egg
  • 1/2 tsp vanilla
  • 1 cup milk
  • 2 Tb Kahlua
  1. Preheat oven to 375°F. Line baking sheets with parchment paper.
  2. In a medium bowl, whisk together flour, cocoa, baking soda and salt.
  3. In the bowl of a stand mixer (or just a large bowl with a hand mixer), beat the butter and brown sugar together until fluffy and light– about 3-4 minutes. I added a picture above to show you what “fluffy & light” actually means. Notice at the sides where the sugar/butter mix is darker? You don’t want it to look like that – beat it until it starts to lighten as the rest of the mixture is. Then add the egg and extract and beat another 2 minutes.
  4. In the measuring cup used to measure the milk, add the Kahlua and stir. Add 1/3 of the flour mix to the batter, beat, then half of the milk mix and beat on low. Add 1/3 more flour mix.  Continue to beat as you add the rest of the milk and finally the rest of the flour mix. Beat until combined.

    Scooped & ready for baking

  5. Using a spoon/scoop/piping bag, put about 1.5 Tb of batter for each Whoopie about 2 inches apart on the prepared baking sheets. (You can make them bigger or smaller if you like – 1.5 Tb makes 2 inch Whoopies.)
  6. Bake for 9-11 minutes or until the whoopie springs back when lightly pressed (it shouldn’t leave an indent).
  7. Let them cool for 2-3 minutes before removing to a rack to cool completely.

Tiramisu Filling

  • The Filling - the dip is delicious but I included an (untried) alternative!

    1/2 cup butter, softened at room temp

  • 1/2 cup (4 oz) cream cheese, at room temp
  • 2 1/2 Tb Tiramisu Dessert Dip Mix (or 2 tsp espresso powder + 1-2Tb cocoa)
  • 4 cups icing/confectioner’s sugar
  • 1 tsp vanilla
  • 2-4 tsp cream/milk/Kahlua or whatever liquid you feel like will add a “Tiramisu-like” flavour
  1. Beat together butter & cream cheese. Add in the mix.
  2. Add the sugar 1/2 cup at a time while beating.
  3. Add the vanilla and liquid. Add as much as needed to get the desired consistency (it shouldn’t be too thick but it shouldn’t be liquidy either)
Assemble by filling two equally sized Whoopie Pies with 1.5 Tb filling (as much as you used for the batter of the Whoopie). Squish together and refrigerate to allow the filling to firm up a little. (I always keep mine in the fridge until about 1/2-1 hour before serving.)

written by Becky


Pumpkin Whoopie Pies with Spiced Maple Cream Cheese Filling

written by Becky

Pumpkin Whoopie Pie with Spiced Maple Cream Cheese Filling

And so it begins, the holiday flavours! I love it! In fact I have already planned Whoopie Pies to make up until Christmas almost! I have one week where I don’t know what to make so if you have a suggestion for a Christmas/holiday themed Whoopie Pie,  send the suggestion this way! I have no idea what I will do with all these Whoopies but I want to make them anyways!

I have to confess something. A couple weeks ago I was out and organic canned pumpkin was on for a good price so I bought 4. Well right after doing that, I read this article that said that Libby’s Pumpkin is so much better than the Farmer’s Market that I had just bought. Apparently the Farmer’s Market stuff can be “chalky” & vegetal… Well that gave me an excuse to not only by first 2 cans of Libby’s Pumpkin but also the Trader Joe’s brand when I went to the States last weekend for some fun grocery shopping (I LOVE Trader Joe’s!). So that means I bought 8 cans of pumpkin in the last month or so! Craziness! Who does that?? So now I have lots of pumpkin baking to do! The good news is that I had already used one can for this snack cake and some scones, and I used a 2nd can for these Whoopie Pies &… uh… I don’t actually remember what I used the first half of the can for! What is wrong with me? Seriously I cannot remember except that I made whatever it was before I made these Whoopies… maybe by the end of the post I will remember again! Anyways, so far I have only used the Farmer’s Market organic stuff so I’ll let you know in the future if there really is any difference!

Cooling Whoopies

This recipe came from a new cookbook – no, I didn’t buy ANOTHER Whoopie Pie cookbook (yet) – that is called “Bake Me I’m Yours…Whoopie Pies: Over 70 excuses to bake, fill and decorate“. What a great title for a book! I love that it is “excuses to bake”. Just what I need! Anyways, on Amazon you can “Click to Look Inside” and there are about 10 recipes that you can see. I have actually tried 3 different pumpkin Whoopie Pie recipes now and I know there are more out there but I liked this one because it didn’t require any buttermilk (which I don’t have right now) or anything too special. In fact, it doesn’t use butter. This is the first Whoopie Pie recipe I have made so far that uses oil and I was curious to see how it went. Well let me tell you that I thought it was delicious! I loved that you could taste the pumpkin quite well and the amount of spices was perfect. It gave a nice warmth but it didn’t overwhelm the pumpkin. Also, they were perfectly moist and lovely and fluffy. Very very tasty! I definitely recommend them (although I still have to make another recipe to make sure they are the BEST ones!)

Oh, right! I made a loaf! A quick and healthy pumpkin loaf! That is what I made with the first half of the can of pumpkin!

Pumpkin Whoopie Pies

(adapted from “Bake Me I’m Yours…Whoopie Pies”, makes about 17 medium sized Whoopie Pies)

  • Dry Ingredients: Mmm... yummy spices!

    2 cups all-purpose flour

  • 1/2 tsp baking soda
  • 1 tsp baking powder
  • 1 tsp cinnamon
  • 1 tsp ginger
  • 1/4 tsp cloves
  • 1/4 tsp nutmeg
  • 1/2 tsp salt
  • 1 cup packed brown sugar
  • 1/2 cup vegetable oil
  • 3/4 cup pumpkin puree
  • 1/4 cup whole milk
  • 1 large eggNote: the batter sits for 30 minutes in the fridge after making it so don’t preheat your oven yet!
  1. Finished batter. I almost forgot to take a picture of it!

    In a large bowl, whisk together the flour, baking soda, baking powder, spices and salt.

  2. In another large bowl or in the bowl of a stand mixer, mix/whisk together the brown sugar, oil, pumpkin puree and milk. Add the egg and mix.
  3. Gradually stir in the dry ingredients until well combined.
  4. Chill for 30 minutes. Preheat your oven to 350° and prepare two baking sheets with parchment paper.
  5. Spoon/Scoop 2 tablespoons for each Whoopie Pie onto the baking sheets. Space them about 2 inches apart.
  6. Bake 8-10 minutes or until the cakes mostly bounce back when pushed with a finger (a slight indent may be left).
  7. Allow to cool 2 minutes on the baking sheet and then transfer to a wire rack to cool completely.

Spiced Maple Cream Cheese Filling

  • 4 oz (1/2 of a package) of cream cheese, room temp
  • 1/2 cup butter, room temp
  • 1 tsp vanilla
  • 1 tsp maple extract
  • 3 1/2 cups icing/confectioner’s sugar
  • 1/2 to 1 tsp pumpkin pie spice (add amount depending on the spice level you want!)
  1. Beat the butter and cream cheese a minute or so until well combined. Add the extracts (it may not look great at this point, just keep going).
  2. Add the icing sugar 1/2 cup at a time and then the spice. Beat well after the final addition. You could also put a couple of tablespoons of real maple syrup in but I find the extract is the only way to really taste it.

Assembly

As I always say, there should be a 2:1 ratio of cookie to icing so put the same amount of icing that you used for each cookie between two cookies and carefully “smoosh” together. Because they are so fluffy and moist, they may squish if you push too hard.