Monthly Archives: July 2011

Chocolate Chip Whoopies with Chocolate Marshmallow Mousse Filling

written by Becky

Chocolate Chip Whoopies With Chocolate Marshmallow Mousse

My best friend from high school and I share the same birthday! Although we aren’t nearly as close as we were in high school, it has always been sort of fun to share the day with her (and rub in that I am a few hours older!) This year, we both turned 30. While I made a fun cake for my birthday, I was unable to see her as she had planned some time away at her parents cabin up north to celebrate the big day. Since her husband wanted to surprise her with a special treat but didn’t think he would be able to hide a cake from her, he thought she would enjoy having some delicious Whoopie Pies instead! So the plan was made!

The Sloppy Chocolate Filling - pre-fixing it!

Although my friend, and I for that matter, is a big chocolate fan, I decided on chocolate chip Whoopie Pies because I wanted to put a tasty chocolate filling in the middle rather than make the straight chocolate Whoopie Pies. After making them, I dipped them in dark chocolate melting wafers and then into Skor bits. Mmm… it was tasty.

I want to comment on the filling here because it is AMAZING!! I started out following a recipe for homemade Chocolate Marshmallow Filling from the Whoopies! cookbook but strayed completely. First of all, it used raw egg whites. I think this can be ok but since I wasn’t in charge of storage etc, I didn’t want to take the chance. Secondly,

The finished Chocolate Marshmallow Mousse

when I got to the end of the recipe, the filling was sloppy – at which point I read the end of the recipe which said that it needs to be refrigerated 3-4 hours and it is suitable for spreading instead of piping. Well I like a nice thick filling and I needed it right then! I was supposed to deliver the Whoopie Pies the next day (and it was already later in the evening) so there was no time to wait. So I got creative. I included the recipe below but I just wanted to layout my thought pattern so if you get into trouble with filling, you have some ideas how to fix it!

  1. I heated the egg whites with the corn syrup to 150ºF to ensure that I killed all bacteria. (By the way, egg whites still beat very well – some say better – after heating).
  2. I added butter to thicken the filling without sweetening it (that would be the other option: more sugar).
  3. I melted chocolate chips with marshmallows to add to the filling to both thicken it and add more chocolate flavour.

Chocolate Chip Whoopie Pies (from Whoopie Pies)

  • 2 1/4 all purpose flour

    Making batter

  • 1 1/2 tsp baking powder
  • 1/2 tsp salt
  • 1/2 cup butter
  • 1/2 cup white sugar
  • 1/2 cup packed brown sugar
  • 2 eggs
  • 1/2 cup buttermilk
  • 2 Tb milk
  • 1 tsp baking soda
  • 1 tsp white vinegar
  • 1 tsp vanilla extract
  • 1+ cup of chocolate chips
  1. Preheat oven to 375°F. Line two baking sheets with parchment paper.
  2. Whisk together flour, baking powder & salt in a bowl
  3. In the bowl of a stand mixer, beat the butter for a minute or so and then add the sugars. Continue beating for another couple of minutes until light & creamy. Add the eggs one at a time.
  4. Add the buttermilk slowly with the mixer on low.
  5. In a small bowl or measuring cup, add the baking soda and then the vinegar to the milk.
  6. First mix in about half the flour mixture, then the milk mix, then finally the rest of the flour. Mix in the vanilla.
  7. With the beater on low or with your hand, stir in the chocolate chips.
  8.  Drop, or scoop (piping won’t work with those big chunks of chocolate in the batter) about 1-2 Tb of batter onto the baking sheets. Space them well as these cookies spread!
  9. Bake 8-10 min or until the cookies just start to brown. Allow them to cool a few minutes before transferring them to a drying rack.

Chocolate Marshmallow Mousse Filling (my own creation!)

  • 2 oz semisweet or unsweetened chocolate

    Cooking the egg whites to 150F to kill bacteria!

  • 2 egg whites
  • 1/3 cup corn syrup
  • 1 3/4 cup icing sugar
  • pinch of salt
  • 1 tsp vanilla
  • 3/4 cup butter, room temp and cut into tablespoon size pieces.
  • 1/2 cup chocolate chips
  • 1 cup mini marshmallows
  1. Melt the chocolate in the microwave at medium heat (don’t overdo it!) and set aside to cool.
  2. Before adding the chocolate the filling was a good sticky consistency!

    Put the egg whites and corn syrup in the top of a double boiler and heat to 150°F while whisking continually.

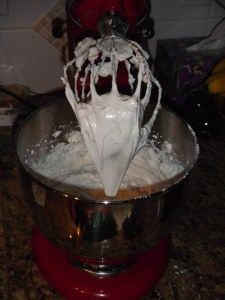
  3. Transfer to the bowl of a stand mixer (or just a regular bowl if you are using a hand mixer). Beat egg whites for about 7-8 minutes with the whisk attachment until the outside of the bowl is no longer hot (the beaten egg whites should be at room temp). Note this is just like making Swiss Meringue Buttercream!
  4. Mix in the melted chocolate. This is when the filling will lose the beautiful puffy peaks you just created! Add vanilla.
  5. Melt the chocolate chips with the marshmallows in the microwave while you wait.
  6. Slowly beat in the icing sugar and salt.
  7. Add butter 1 tablespoon at a time while the mixer is running. Beat well between each addition.
  8. Beat in the chocolate chips & marshmallow mix.
  9. This stuff tastes delicious so eat some!
Fill the the Whoopie Pies with the filling. Squish together. Dip in melted chocolate and then dip into Skor bits! Yum!!


The Beauty of Red – times TWO!

written by Becky

Two Different Red Velvet Whoopie Pies with Cream Cheese Filling

Which is better? Left is Whoopie Pies recipe, right is Whoopies! recipe

I admit it, I have two pairs of shoes that are almost identical but one pair is black and one pair is white. This may seem like a good idea but what pair do you wear with a black and white dress? Or do you wear the fabulous red strappy ones instead? Here is my problem: I have trouble making decisions with some things. I have actually gone on vacation with 12 pairs of shoes (10 day vacation) and took pictures of my feet in each pair just to prove that I in fact did wear every pair. I know this may seem weird to some of you but I have some great shoes that I don’t get to wear frequently so instead of choosing which ones I want, I just take all of them!

Oh decisions...

I have the same problem with recipes: when you have two whoopie pie books and each has a Red Velvet recipe, which one do you choose?? That was my dilemma when I decided that I wanted to make them. I had made one recipe about 6 months ago but how do you compare that recipe to a different one without trying them simultaneously? Well to me the answer was simple: make both!

Any time I take Red Velvet somewhere people always ask what exactly the flavour is supposed to be. Generally it is described as a vanilla cake with a touch of cocoa plus some food colouring to give it the signature red-brown colour (although apparently you can you use beet puree but I haven’t tried it yet) . The reaction of the buttermilk with the vinegar (yes, there is vinegar in the cake) enhances the bright colour. Interestingly, as I just found out, before Dutch process cocoa became available the red colour was more pronounced because the cocoa was less alkaline. Since the description of the cake isn’t that impressive, I must point out that it is all about the moist and tender crumb. It really is a delicious cake!

First is the recipe from “Whoopies!” (on the left in the picture). This one was sort of interesting because you mix the red food colouring with the buttermilk, vanilla and vinegar in a bowl prior to adding it to the whoopie batter. I am not sure exactly what this does though. Regardless, this recipe makes what I think of as a more traditional Red Velvet crumb and a brighter red colour. Here’s the recipe:

Red Velvet Whoopie Pies I (makes 20 medium sized Whoopie Pies)

  • The red liquid mix

    1/2 cup buttermilk

  • 1/2 tsp vanilla
  • 1/2 tsp red paste food colouring
  • 1 1/2 tsp white vinegar
  • 1/2 cup butter, softened
  • 1 cup white sugar
  • 1 egg
  • 2 cups flour
  • 1 tbsp cocoa
  • 1/2 tsp baking soda
  • 1/4 tsp salt
  1. Preheat oven to 375°. Line baking sheets with parchment paper
  2. In a small bowl, stir together buttermilk, vanilla, red food colouring, and vinegar.
  3. Beat together butter and sugar until light and fluffy. Add the egg and beat more.
  4. In a different bowl, whisk together flour, cocoa, baking soda andsalt. Alternating with the buttermilk mixture, add to the butter/sugar (start and end with the dry ingredients).
  5. Scoop, pipe or spoon the batter onto the baking sheets.
  6. Bake 10-12 minutes. They are done when you can push lightly on the top and the whoopie pies spring back and don’t leave a dent.
  7. Allow to cool on the sheet a few minutes and then transfer to a rack to cool completely.
  8. Fill with Cream Cheese Filling recipe provided at the end.

    Piped Whoopies

Red Velvet Whoopie Pies II (makes 30 medium sized Whoopie Pies)

This recipe is adapted from the Whoopie Pies cookbook (shown on the right above). Although most testers said they prefer this recipe, I think it is actually because the cake is chocolate’ier and denser rather than it being more “Red Velvet-Like”. I still haven’t really decided which one I prefer. I guess it depends what you are looking for.

  • Recipe #2 Piped

    3 cups flour

  • 1/4 cup cocoa
  • 1 tsp baking powder
  • 1/2 tsp baking soda
  • 1/2 tsp salt
  • 1 cup butter, room temp
  • 1/2 cup brown sugar
  • 1 cup white sugar
  • 2 eggs
  • 2 tsp vanilla extract
  • 1 tsp red gel paste
  • 1 cup buttermilk
  1. Preheat oven to 350° and line baking sheets with parchment paper.
  2. Whisk together flour, cocoa, baking powder, baking soda and salt.
  3. Beat together butter and sugars until fluffy and smooth, about 5 minutes.  Add the eggs one at a time and then the vanilla and red food colouring.
  4. Add the flour mixture and buttermilk alternatively starting and ending with the flour mixture. Beat until combined.
  5. Using a spoon, scoop or piping bag, put about 1.5 Tb per cookie.
  6. Bake 8-10 minutes (or until the cakes spring back when lightly pressed)
  7. Allow to cool a few minutes on the cookie sheet before transferring them to a rack to cool completely.
  8. Fill with Cream Cheese Filling

Cream Cheese Filling

  • 1 pkg (8oz) cream cheese, room temp
  • 1/2 cup butter, room temp
  • 1 tsp vanilla
  • 3 cups icing sugar
  1. Beat together cream cheese and butter. Add vanilla then sugar (1/2 cup at a time)